Panasonic Q Restoration Project – Episode IV
Just published the latest video in the series, where I am restoring an imperfect Panasonic GameQ to hopefully a fully working one – giving New Hope to bringing it back to its beautiful self.
In Episode III we thankfully discovered that it was fully capable of reading discs and the drive tray functioned, despite being damaged. This damage resulted in the inability in opening and closing without being propped up from the inside. So, it was clear what needed to be done, replace the rails to support the drive on the inside and the actual tray too.
Replacement Rails – Due to the damage of the front of the drive tray itself too, it was obvious I needed to replace all three parts of the drive support; the left and right rails, as well as the drive tray itself. It will be a long time before all three of this genuine OG parts will materialise, so I am using reproduction parts. These 3D printed parts are available from Retro Refurb UK.
Whilst the process itself of getting down to the drive and replacing the rails was nerve racking as it is, I encountered the issue where after replacing, the drive was now no longer able to open and close due to a loss of torgue. I tried many possibilities before coming to the conclusion that it was the torque, so tried replacing the drive band. –
I will be continuing my Panasonic Q series and releasing more videos in the future. I have plans to tackle the GameBoy player (crazy expensive), covering off some of the accessories for this unusual piece and restoring the less perfect parts.

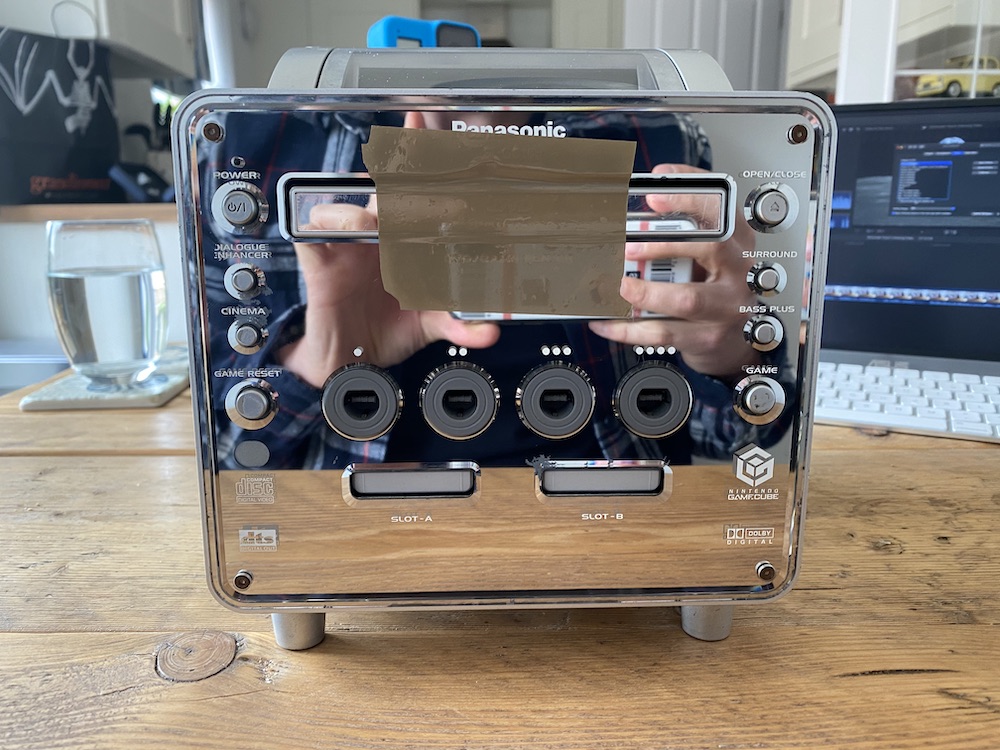
If you have never seen one of these game consoles before, then say hello to the Panasonic made DVD & Nintendo GameCube combi device, otherwise known as the “Panasonic Q”. Panasonic were the manufacturer for the disc drives in the official Nintendo GameCube and as part of that business relationship, they were allowed to create their own version of the GameCube. Well, of course they wanted to go above and beyond the original and in many ways they did. Offering a full DVD player, a feature that helped make the PlayStation 2 such a huge success, and a design that screamed modern multimedia experience. The thing very much looks like Hi-Fi’s of the late 90s and early 00’s before the iPod changed that industry for good. They really went big on the design, with a backlit LCD display and this excellent blue glow around buttons and the GameCube controller ports. For many Nintendo fans over here in the west though, it was just a day dream. Not only was it crazy expensive at around £400 back in 2001, but as it was only ever released in Japan, it made it even more pricier as traders imported and added their cut onto that price. Due to the limited release, it only ever sold around 100,000 units, which for a console is very small numbers and makes it quite rare.
After nearly 20 years of drooling over this product (what some consider the best looking Nintendo console of all time) I have finally got my grubby little hands on one. However, to reminisce that scene in Ghostbusters, when Ray first turns up at the old firestation building with a beaten old Cadillac and lists the multiple issues to Peter and finishes off an optimistic “…but it works”, it’s the same here. There’s quite a lot of work to get it up to former glory, but it does apparently work.
As well as actual damage to components to get it working, there are some aesthetic blemishes I will want to correct at some point and of course, the missing included accessories I will need to acquire too, such as the official Panasonic branded controller. My initial list of what I know of is below.
The Issues and bits I know about:
- Matching Panasonic GameCube Controller
- Game Boy Player serial port cover
- Digital Component Cable
- Panasonic DVD Remote
- A lot of Rattling inside
- DVD Drive draw End Cap broken
- DVD Drive collapsed inside
- Mirror effect worn behind front plastic
- Top screen housing worn
All things that will take time, research and hunting on eBay and other forums. So this posting will be something of a diary on the ongoing project. I’ll update each stage by stage with observations, issues I’ve encountered (and hopefully overcome). As well as parts I purchased and tricks I learn on the way.
Step 1: What’s rattling inside?
Before I even want to turn on, I want to work out what the rattling inside is from. If any loose parts turn out to be a loose PCB or screw, it could cause shorting out, so I want to remove any bits I can. However, this guy is not an easy product to deconstruct inside. There’s a lot of ribbon cables, a lot of screws and a lot of parts.
I won’t go any deeper than the top of the DVD drive, as to go further, is a much more complex job that means I have to remove the front, back and more levels of the board inside. I do not want to do this unless I have to.
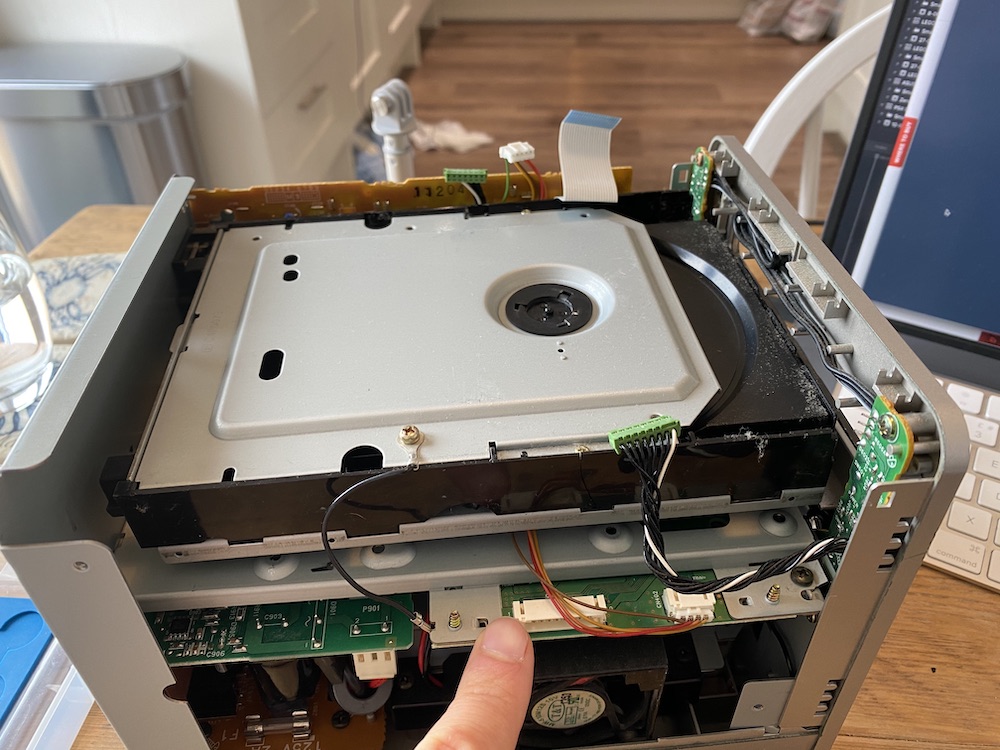
Observation – I will definitely need the replacement disc drive rails to put the drive back to where it needs to sit. As I don’t have a 3D printer myself, I will need to order one from someone like RoseColouredGaming.
Step 2: Does it Power on?
As the Panasonic Q has it’s power converter inside the product (and now way of swapping out) I needed to get a step-down convertor to exchange the 240V UK power to the 110V Japanese power needed. I now have this, so can get this guy plugged in to see if it does turn on (I may have cocked up something) and what appears to work and what doesn’t.
The great news, is that it indeed turns on and all lights appear to be working too, including the backlit LCD. What is interesting though, is as soon as it goes into GameCube mode, how loud the fans kick off. If I click the OPEN/CLOSE button, the screen says OPEN but nothing happens. Not surprising as the disk drive inside is wonky and the drawer physically can’t come out safely. So, before writing off the drive, I need to ensure it is mechanically able to open and close, even with its cracks and gaps. To do this I had to take off the side panel and prop up the drive to keep the tray aligned with the slot before clicking OPEN/CLOSE. What did I use to prop up the drive? A Game Boy cartridge case… worked a treat. The Drive is indeed able to open and close. Woohoo!
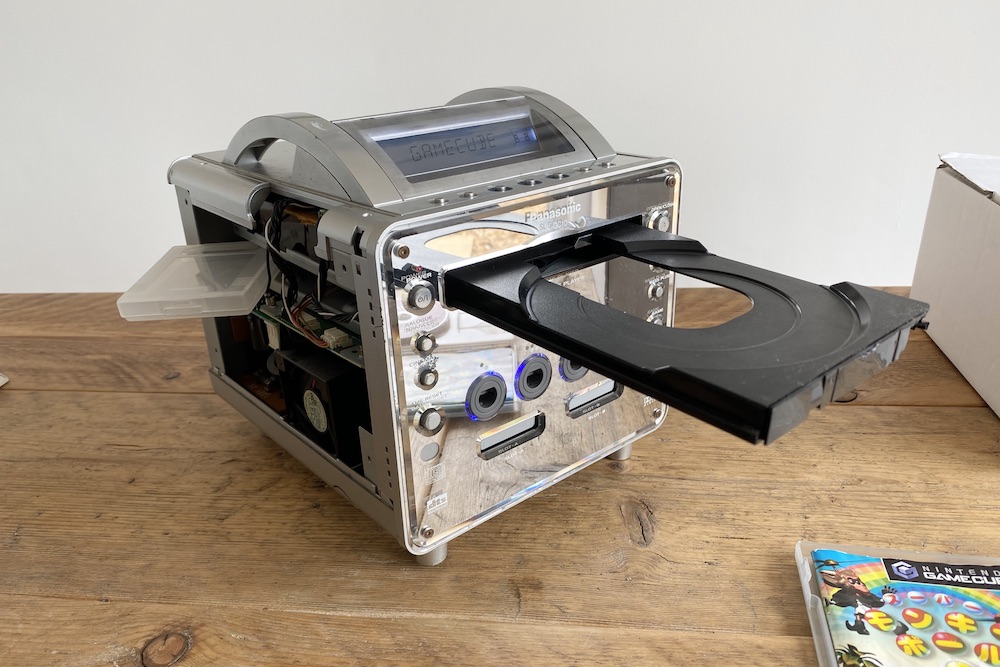
Observation – So the disk drive mechanically appears to be ok, but we need to make sure the laser and spindle are ok and it is able to run and read disks ok. I’m also taking note of the incredibly loud fans when in GameCube mode, I will monitor this as could be a sign of another problem.
Step 3: Does it Play Games?
Japanese game acquired, one of my faves “Super Monkey Ball 2”. Really fun, whimsical arcade game that doesn’t need much explanation to get past the language barrier – not only because I know the game inside out, but also the iconography is very self explanatory.
Official Panasonic Q controller acquired. It’s not in the best overall condition, needs a clean and the joystick is mega loose. Very likely will take replacement parts from a normal GameCube pad to fix up using the
So it powers on, but does it actually work? So, two tests here: Does it read discs and does it output video/sound. Well, let’s plug it in and find out.
